
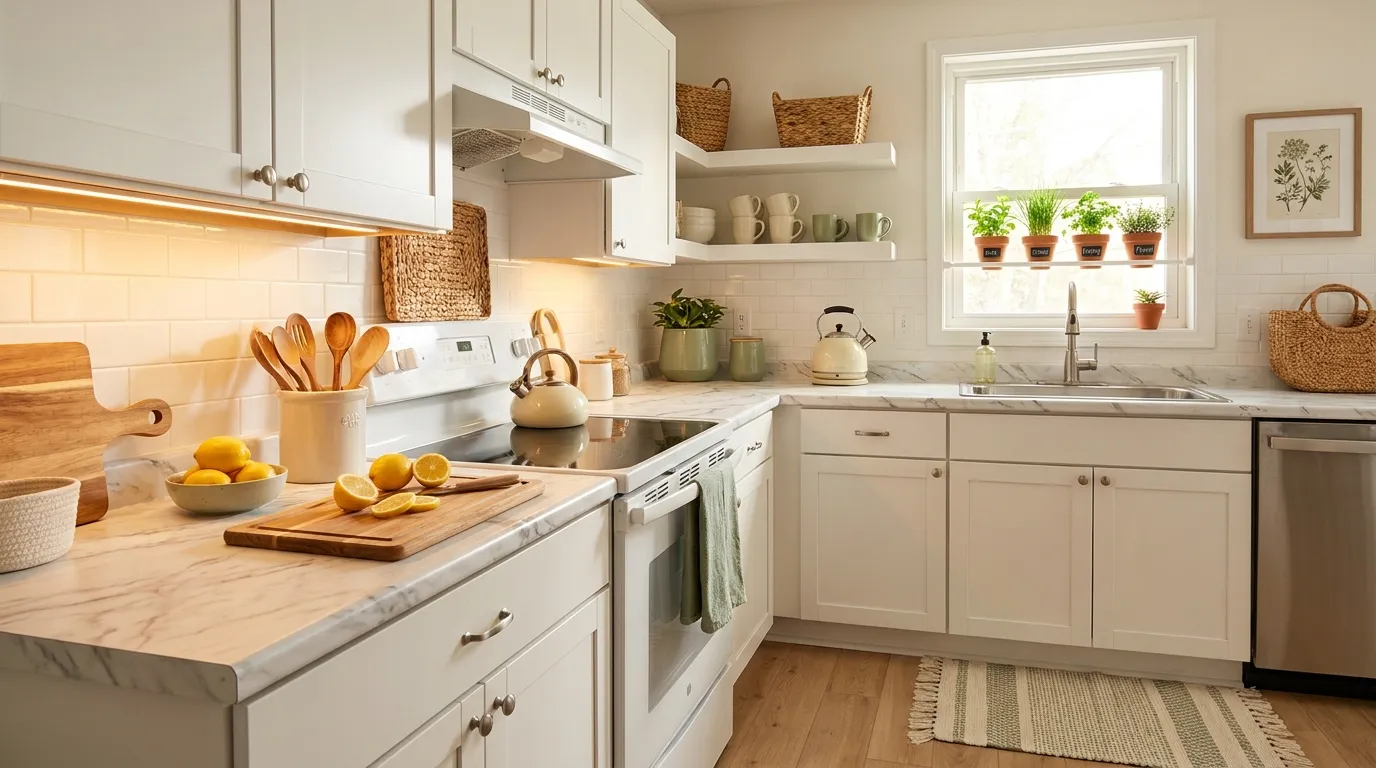
Your landlord picked the kitchen, but you’re the one cooking in it every night.
Most rental kitchens come with the same lineup. Speckled beige counters, one harsh ceiling light, plain silver knobs, and a floor that has seen a few too many tenants. Big changes like paint or new cabinets usually aren’t allowed, and nobody wants to lose a deposit over a weekend project.
That’s where these renter-friendly kitchen upgrades come in. Every one of them goes in during a single afternoon and comes back out just as easily when your lease ends. Most need nothing more than a screwdriver, a smoothing tool, or a roll of adhesive film.
The list mixes ideas from real kitchens with fresh ones, all built for small spaces. There’s warm under-cabinet lighting, marble-look counters, a fabric curtain to hide the mess under the sink, and a wooden cover that turns your stove into prep space. A few take less than an hour, and none of them need a contractor.
Pick the one that bugs you most and start there.
1. Swap Harsh Overhead Light for a Warm Under-Cabinet Glow
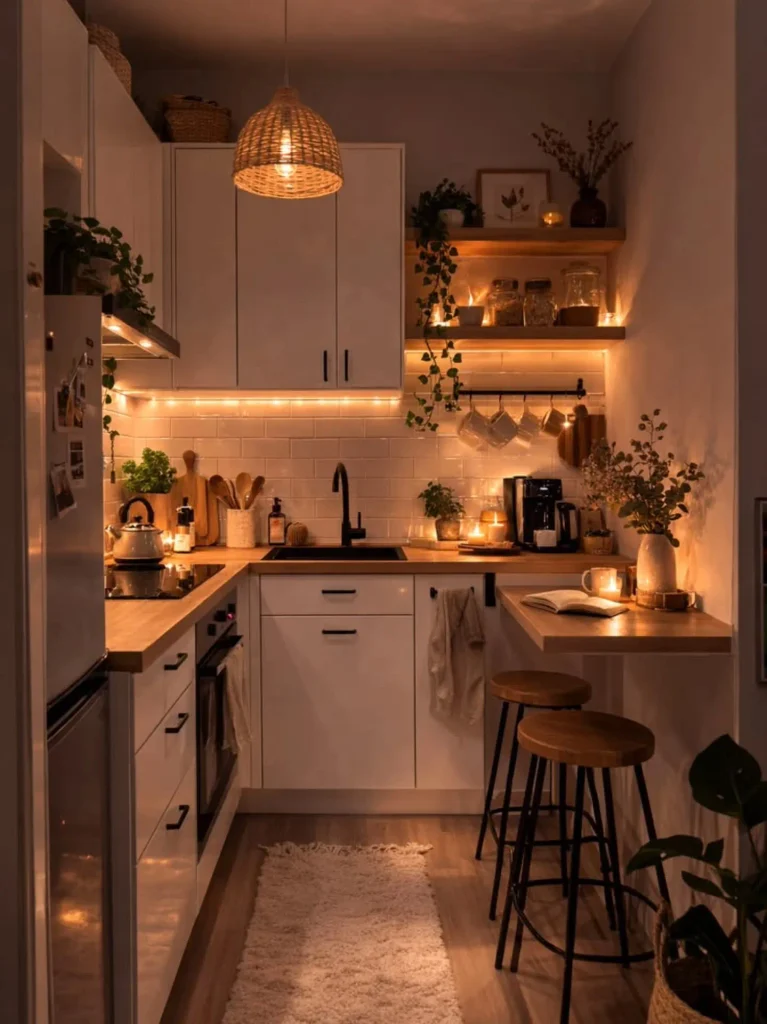
Most rentals come with one bright ceiling light that makes a small kitchen feel like an office break room. In this cozy L-shaped kitchen, almost all of the light comes from lower, warmer sources, and none of it needed an electrician.
The main source is a plug-in LED strip tucked under the upper cabinets. Here is how to put one up and take it down cleanly:
- Wipe the underside of the cabinet with rubbing alcohol so the tape sticks.
- Stick the strip near the front edge so it lights the counter and not your eyes.
- Run the cord along the bottom of the cabinet to the nearest outlet, using small adhesive clips.
On moving day, warm the tape with a hair dryer and peel it off slowly. It usually comes away without leaving marks.
The three light layers in this kitchen
2. Fake a Hand-Painted Tile Panel Behind the Stove
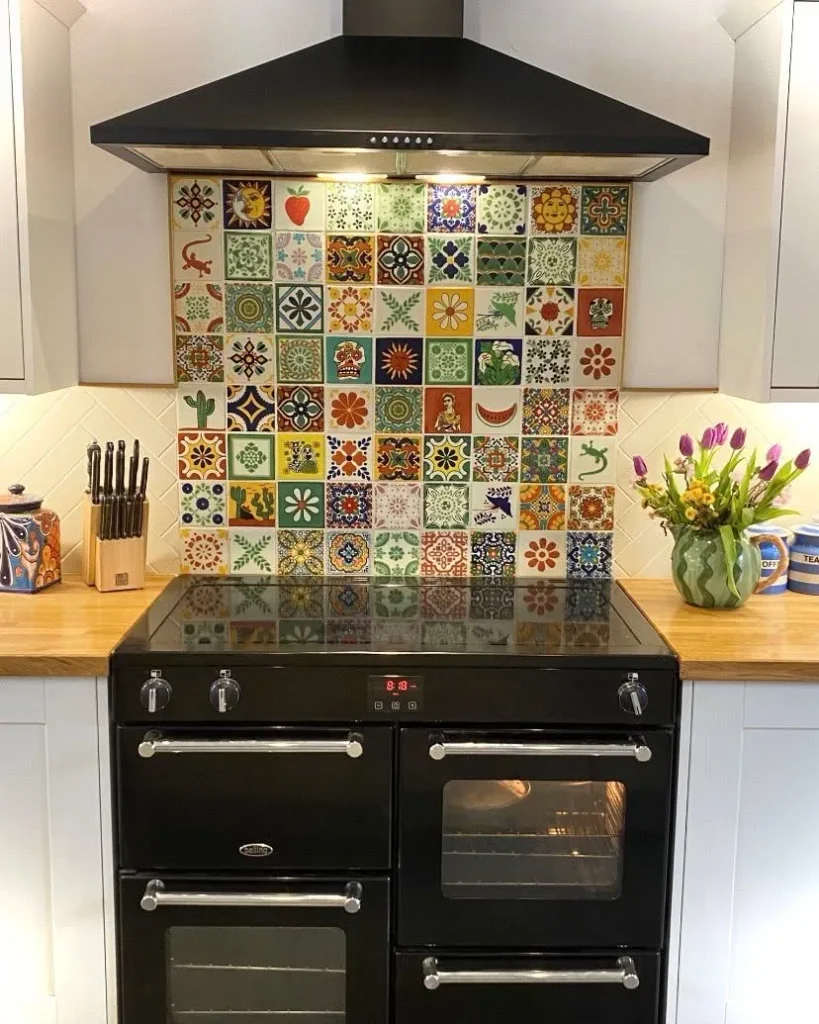
You don’t have to tile the whole wall to get this much color.
In this kitchen, a patchwork of hand-painted Mexican-style tiles fills only the panel between the range and the hood. The rest of the backsplash stays plain cream tile set in a herringbone pattern. Renters can get a similar look with peel-and-stick tile stickers placed over the existing backsplash.
Why the patchwork works:
- No two squares next to each other match, but the same few colors repeat across the panel: marigold, cobalt, green, and brick red.
- Playful motifs like a cactus, a lizard, and a slice of watermelon break up the geometric squares.
- The black range and hood frame the panel, so it looks like one finished piece.
Because the panel sits right behind the burners, check the package for a heat rating before you buy.
Want more styles than a painted tile look? These temporary backsplash ideas that look permanent cover everything from zellige to faux brick.
| Real ceramic tile, as pictured | Peel-and-stick version | |
|---|---|---|
| Install | Mortar and grout, often a pro job | Stick on in an afternoon |
| Removal | Chipping off and wall repair | Peel off, warming stubborn spots with a hair dryer |
| Landlord | Needs permission | Usually fine, but check your lease |
| Near heat | Handles it well | Check the heat rating first |
| Up close | Glossy, hand-painted depth | Flat print, and grout lines can show through on textured tile |
| Cost | Higher | Lower |
3. Wrap Dated Laminate Counters in Marble-Look Film
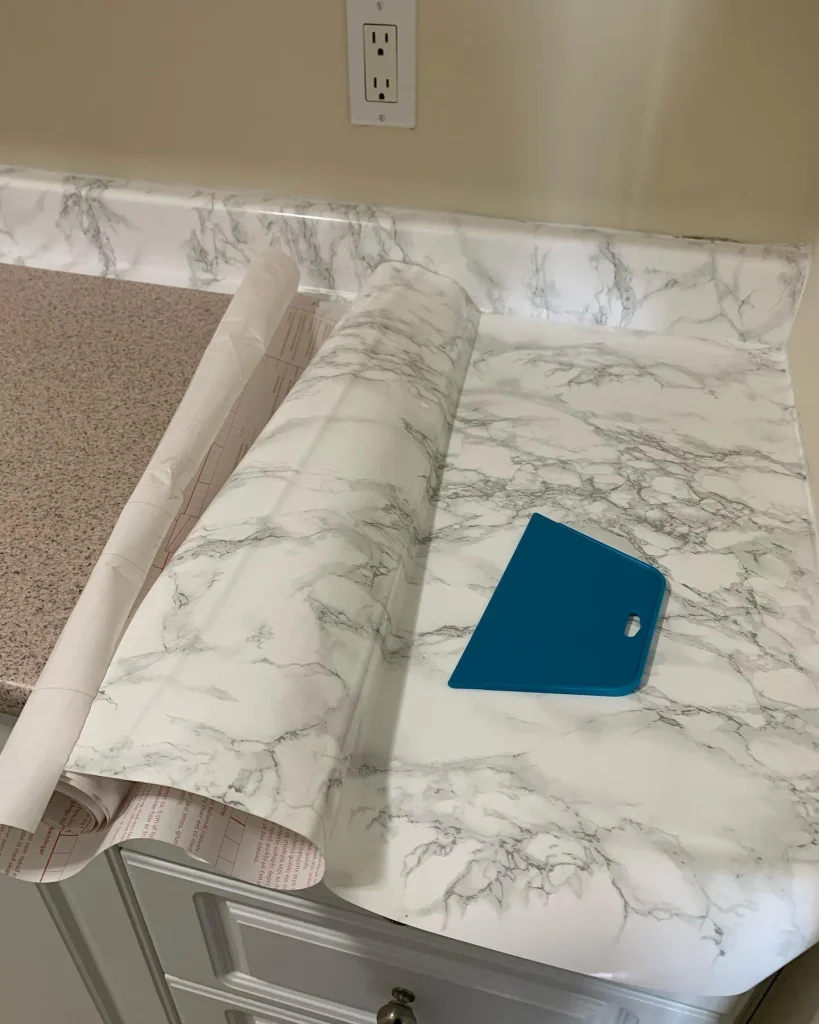
Speckled beige laminate turns up in a lot of older rentals, and it can make the whole kitchen feel tired. This photo catches a counter halfway through the fix. The original laminate is still showing on the left, and marble-look contact paper has already been smoothed down on the right.
Look at the edges. The film wraps over the rounded front lip and runs up the short backsplash. That way no strip of old laminate peeks out. People often skip those spots, and they’re the ones everyone notices.
Notice the tool. The blue plastic smoother on the counter pushes air bubbles out as you work. The backing paper is printed with a grid, which makes straight cuts easier.
From across the room, it passes for stone.
Getting the edges and seams right is the tricky part, so follow my step-by-step countertop film guide before you cut a single panel.
Test a small hidden patch first, then peel it to see how cleanly it comes off.
Degrease the counter and let it dry fully before you start.
Work from the back toward the front edge, smoothing as you go.
Leave a little extra at the edges and trim it with a sharp blade once it’s stuck.
Setting hot pans straight on the film. Keep a trivet nearby.
Cutting food right on the surface. Always use a board.
Covering chipped or peeling laminate. Every bump will show through.
4. Hang Your Knives on the Wall and Win Back Counter Space
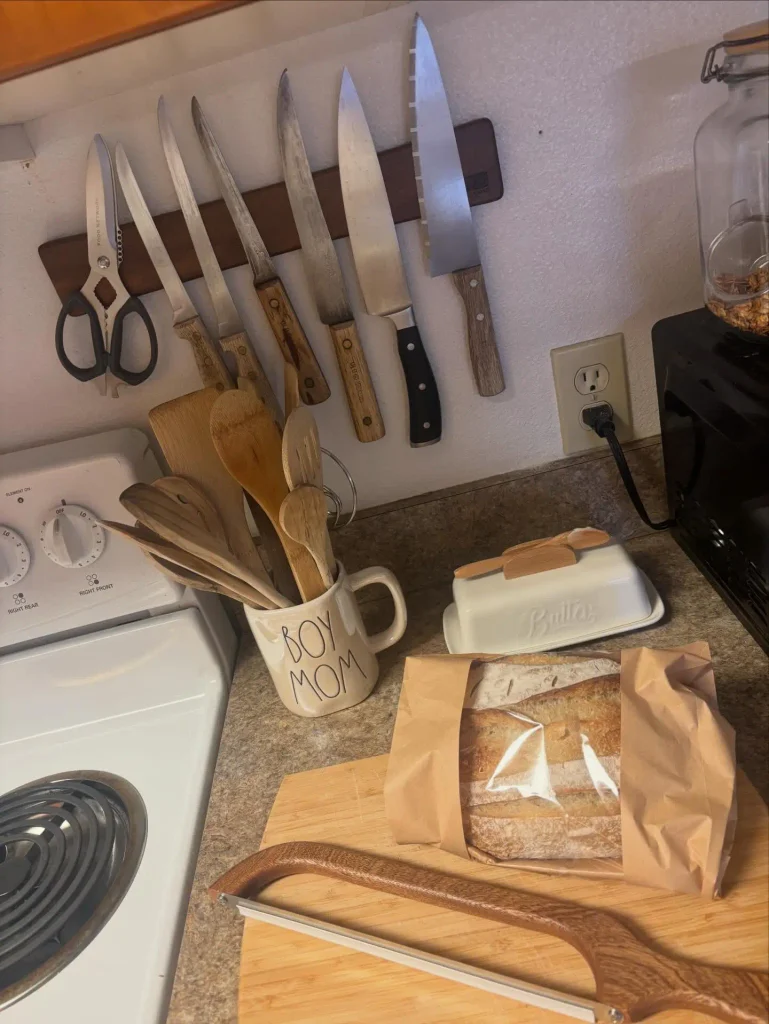
Knife blocks take up a surprising amount of counter space, and in a small rental kitchen every inch counts. Here, a dark wooden magnetic strip holds six knives and a pair of kitchen shears on the wall beside the stove. A tall mug full of wooden spoons sits below and handles the rest of the tools.
Will it leave holes? Most strips hang on two small screws, and a dab of spackle fills the holes on move-out.
What about adhesive strips? They’re fine for a few light knives. Check the weight limit before you add a heavy chef’s knife.
Wood or metal? Wood tends to be kinder to blade edges, and it goes nicely with wooden handles like the well-worn ones in this photo.
With the block gone, there’s room underneath for a cutting board and a fresh loaf.
Hanging a knife strip, renter style
Pick a spot away from sink splashes and up where small hands can’t reach.
Hold the strip level and mark the screw holes lightly with a pencil.
Drill small pilot holes. If there’s no stud behind the spot, use drywall anchors.
Touch each knife to the strip spine first, then roll the blade flat so the edge doesn’t snap against the magnet.
5. Swap Plain Cabinet Pulls and Bag Up the Originals
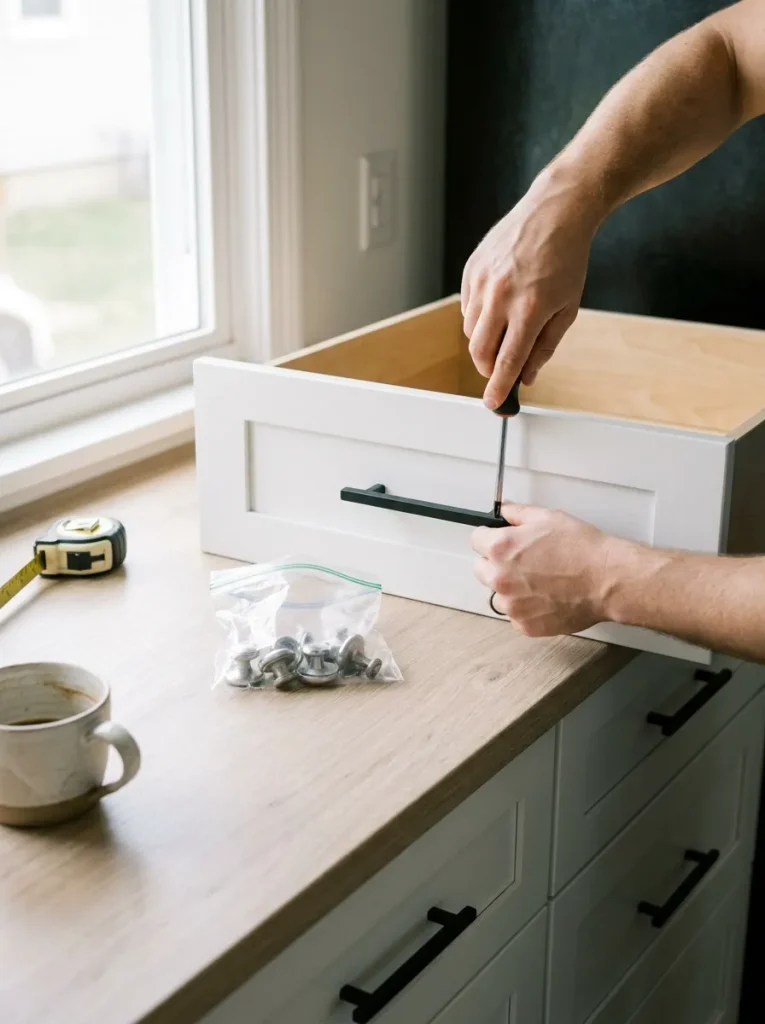
With a screwdriver and about an hour, dated cabinets can look new.
Most rental kitchens have the same shiny silver knobs or thin wire pulls. Switching to matte black bars, warm brass knobs, or leather tab pulls changes every cabinet at once. Put the original hardware and screws in a zip bag, label it, and tape it inside the cabinet under the sink. On move-out day, you’ll know exactly where everything is.
You can mix styles if you like. Knobs on the doors and pulls on the drawers look planned rather than random.
If new pulls aren’t enough, you can update the cabinet doors themselves with vinyl and no paint at all.
Before you order new pulls
6. Hide Pipes and Clutter Behind a Fabric Cabinet Curtain
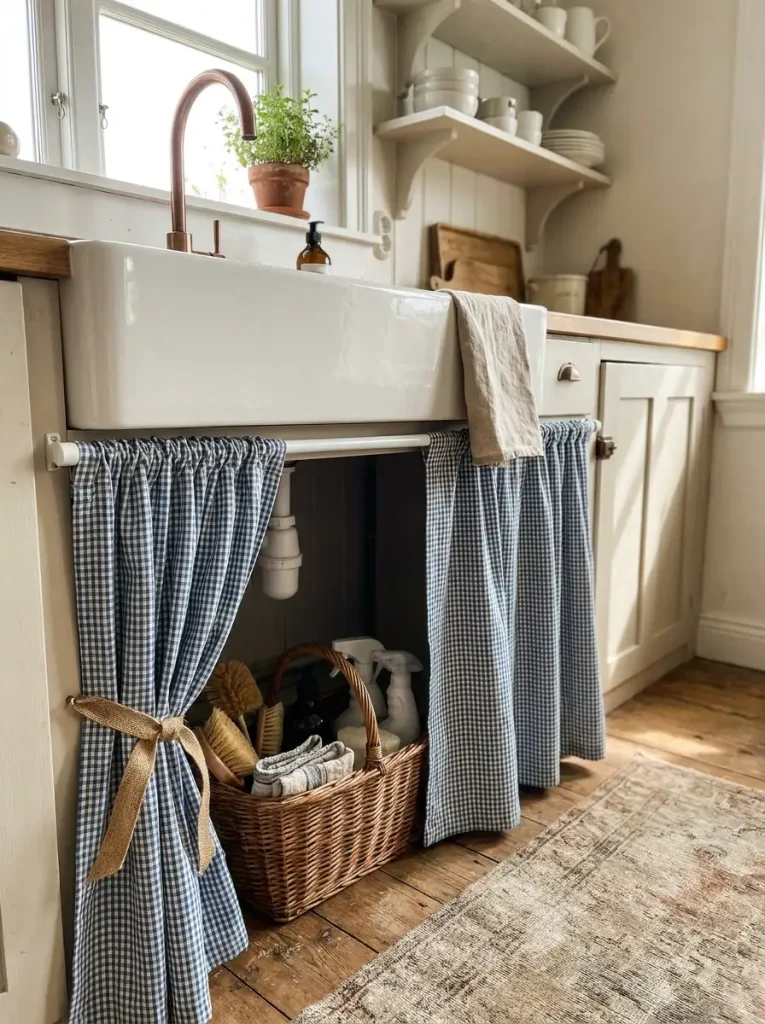
Under the sink is often the messiest corner of a rental kitchen, and some older units don’t have a door there at all. A short fabric curtain hides the pipes, the trash bags, and the cleaning spray all at once.
There are two easy ways to hang it.
Tension rod. It fits inside the opening with no tools. This works best when the cabinet has side walls for the rod to press against.
Adhesive hooks and a café rod. These stick to the front frame. This is the better choice when the opening is wide or uneven.
Linen, a small gingham check, or a faded floral all look good. Choose something washable, because sinks splash.
7. Cover a Tired Floor with Peel-and-Stick Tiles
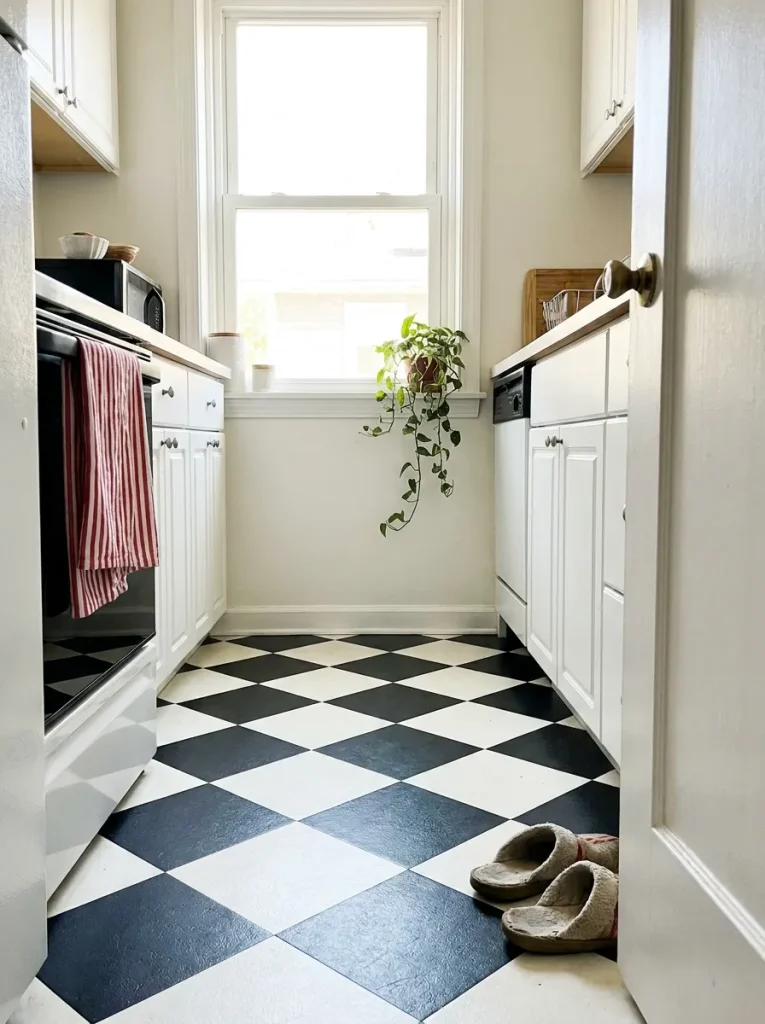
Galley kitchens have one big advantage here: there isn’t much floor to cover. A small kitchen might need only a few boxes of peel-and-stick vinyl tiles, so the whole job fits in an afternoon.
Patterns that suit small kitchens:
- Black and white checkerboard set on the diagonal, which makes a narrow room feel wider.
- Bold patterned tiles in muted colors, which work well when the walls and cabinets are plain.
- Warm terracotta-look squares, which hide crumbs and pair nicely with wood counters.
Start your first row in the middle of the room, not against a wall. Walls in older rentals are rarely straight.
For more ways to use peel-and-stick tiles over rental floors, plus rugs and runners, see my full list of fixes.
⚠️ Watch Out
Peel-and-stick tiles grip best on smooth, flat floors like sheet vinyl. Over ceramic tile with deep grout lines, the lines can show through. Some tiles leave sticky residue when lifted, so stick one in a hidden spot for a week and then peel it up as a test. If you’re not sure, check your lease, since some landlords want to hear about floor changes.
8. Turn the Stove into Prep Space with a Wooden Cover
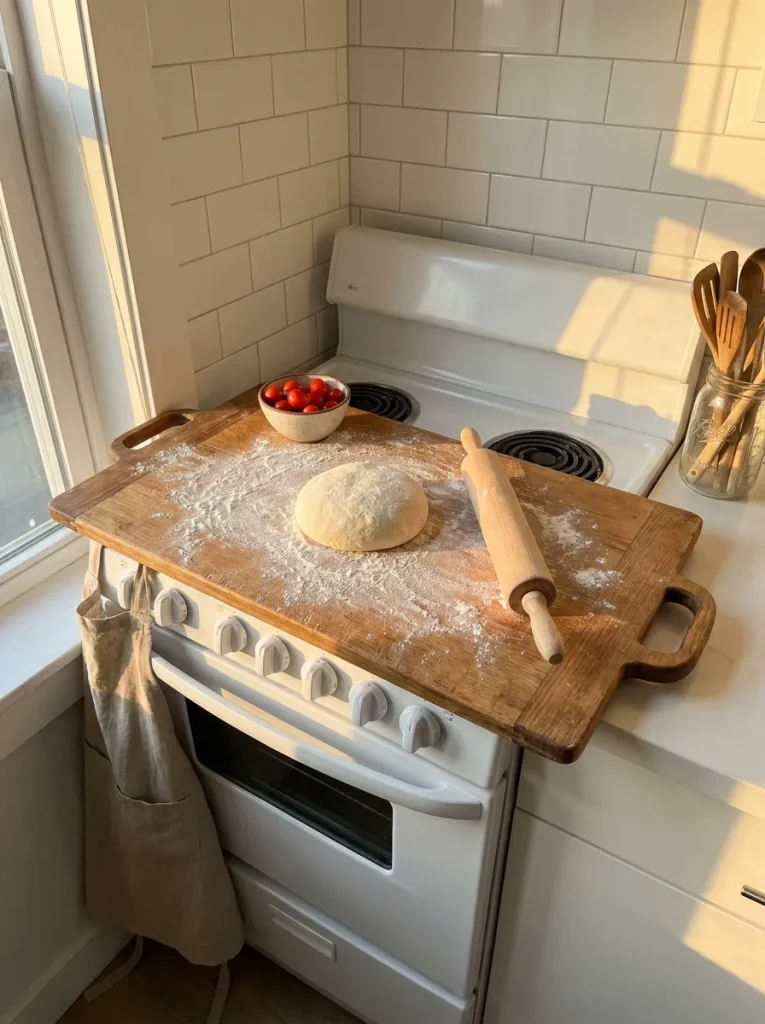
Counter space runs out first in a tiny kitchen, yet the stove sits unused most of the day. A wooden stove top cover, sometimes called a noodle board, lies flat over the burners. It turns them into a long prep surface or a spot for a fruit bowl.
What to look for:
- A board sized to your stovetop, with feet or side rails that keep it steady.
- A food-safe finish if you plan to knead dough or chop on it.
- Handles, so you can lift it off with one hand when it’s time to cook.
Never turn on a burner with the board in place. Let the stove cool completely before you set it back.
A stove cover is one trick. Here are more ways to add counter space without drilling, from an over-the-sink board to a rolling cart.
Four cold burners collecting crumbs and a pile of mail between meals.
A warm wood surface for rolling dough, setting down grocery bags, or holding a bowl of lemons, and it lifts off in seconds when it’s time to cook.
9. Take the Doors Off Your Upper Cabinets

Upper cabinets without doors look like open shelving, and they make a cramped kitchen feel less boxed in.
The doors come off with a screwdriver in a few minutes. Store them flat under a bed or behind the couch, wrapped in an old sheet so they don’t get scratched.
The catch: everything inside is now on display. Stick to dishes in one or two colors, and pour pasta, rice, and oats into matching clear jars. Leave a little empty space on each shelf so it looks styled rather than stuffed.
Done well, it looks like a design choice, not a rental.
Taking the doors off without losing a screw
Number each door and its cabinet with painter’s tape on the inside edge.
Unscrew the hinges from the cabinet frame and leave them attached to the door.
Put the screws in a small bag and tape it to the back of the matching door.
Wipe out the inside, then line the back wall with removable wallpaper if you want a little color.
10. Roll Out a Washable Runner Rug
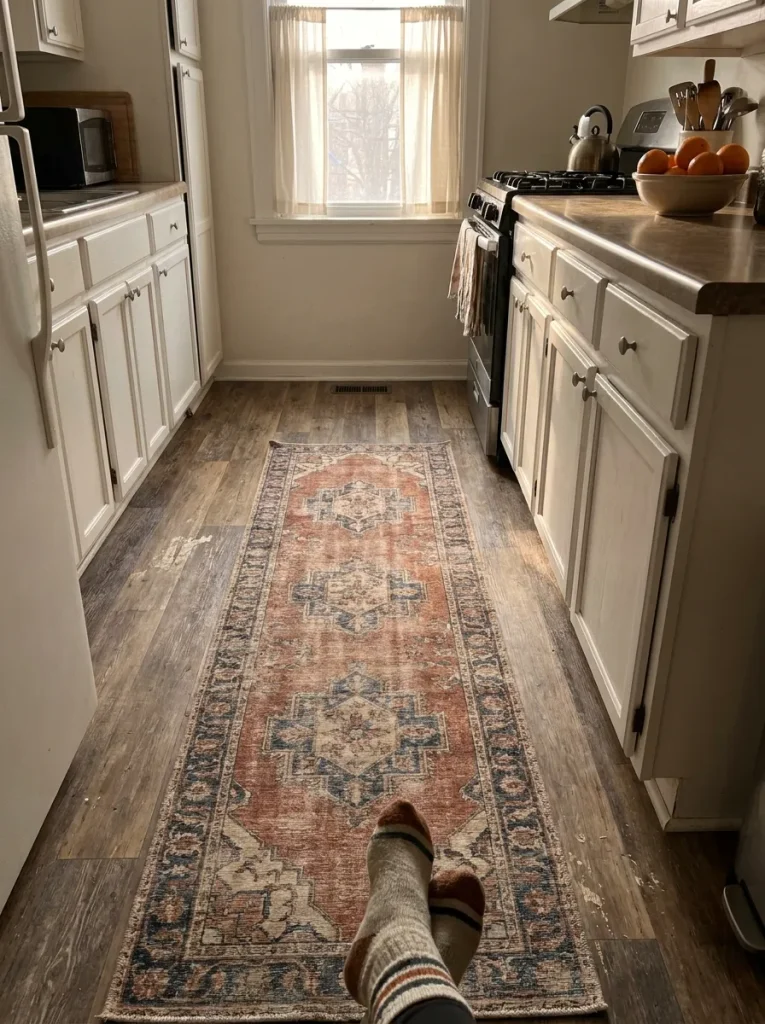
Worn kitchen floors are hard to fix in a rental, but they’re easy to cover. There are no tiles and no glue involved. You just roll it out.
A runner hides scuffs, adds pattern to a plain room, and is softer to stand on while you wash dishes. Size matters in a small kitchen:
- Leave a strip of bare floor showing on both sides so the room doesn’t look smaller.
- Keep the rug clear of where the oven and dishwasher doors swing open.
- Choose a busy pattern with several colors, since small spills disappear into it.
Put a thin non-slip pad underneath. A rug that slides on a kitchen floor is a fall waiting to happen.
| Flatweave cotton | Washable low pile | |
|---|---|---|
| Underfoot | Thin and firm | Softer, with a bit of cushion |
| Cleaning | Shake it out daily, wash when needed | Made for the washing machine, so check the label |
| Staying put | Needs a rug pad | Some come with a grippy backing |
| Best for | Busy cooks who make a mess | Long stretches standing at the sink |
11. Park a Slim Rolling Cart Where Drawers Should Be

Short on drawers? A three-tier rolling cart adds storage without drilling a single hole. Slim ones fit in the gap between the fridge and the wall. Wider ones park at the end of the counter and work as extra prep space when you pull them out.
Working with barely any counter? These small kitchen ideas for apartments pick up where this list leaves off.
Look for locking wheels so the cart stays put while you chop. A top tier with a raised lip keeps jars from sliding off when you move it.
And on moving day, it rolls straight onto the truck.
What goes on each tier
12. Grow Herbs on a Window Shelf Above the Sink
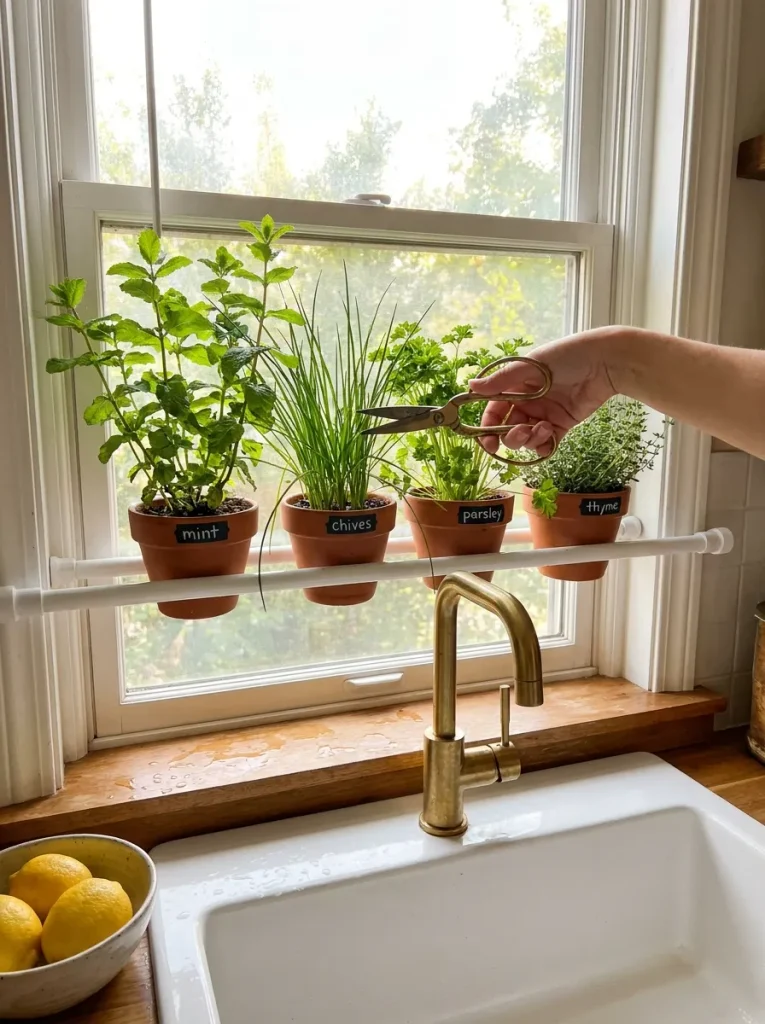
Bunches of store-bought herbs often wilt in the fridge before you use them up. A small shelf in the kitchen window keeps a few pots growing right where you cook.
For renters, the easiest option is a tension rod shelf that presses between the sides of the window frame. If your sill is deep enough, a simple tray of pots works without any hardware at all.
Mint, chives, parsley, and thyme are easy herbs to start with. Snip a little often, and most will keep growing back.
Use the window that gets the most sun in your kitchen.
Set pots on saucers so water doesn’t drip onto the sill.
Turn the pots every few days so the plants don’t lean toward the glass.
Watering on a set schedule. Press a finger into the soil first.
Packing the pots tight. Plants need a little air between them.
Letting tender herbs like basil touch cold glass in winter.
Conclusion
A rental kitchen doesn’t have to feel temporary just because your lease is. Start with whatever bothers you most. For some people that’s the lighting, and for others it’s those speckled counters. One afternoon of work can change how the room feels every time you walk in to make coffee.
The real trick behind renter-friendly kitchen upgrades is saving every original piece. Bag the old knobs, number the cabinet doors, and moving out stays as easy as moving in.
If one of these ideas gave you a plan for your own kitchen, save this pin to your renter decorating board so it’s ready when the weekend comes.
Your move-out day checklist

