

Your bed shouldn’t be the first thing guests see when they walk through the door. In a studio, though, it usually is. Everything shares one room: where you sleep, where you eat, where you work, and where you flop on the couch at night. A curtain is the usual fix, but it can look flimsy, gather dust, and make a small space feel even smaller.
You have far more choices than fabric. This roundup of studio apartment bedroom divider ideas covers dividers that store your things, dividers that let the light through, and a few that aren’t really dividers at all. Some use furniture you probably already own, like a bookshelf or a wardrobe turned on its side. Others are simple weekend builds, like a slat wall or a painted arch. There are softer options too, like climbing vines and a bare canopy frame.
Most of these work in a rental, and several come apart when it’s time to move. Find the one that fits your space and your budget, and your bed finally gets a room of its own.
Before you shop, skip the solid floor-to-ceiling divider. It’s one of the studio apartment mistakes that make your space feel smaller.
1. Let a Tall Open Bookshelf Stand In for a Wall
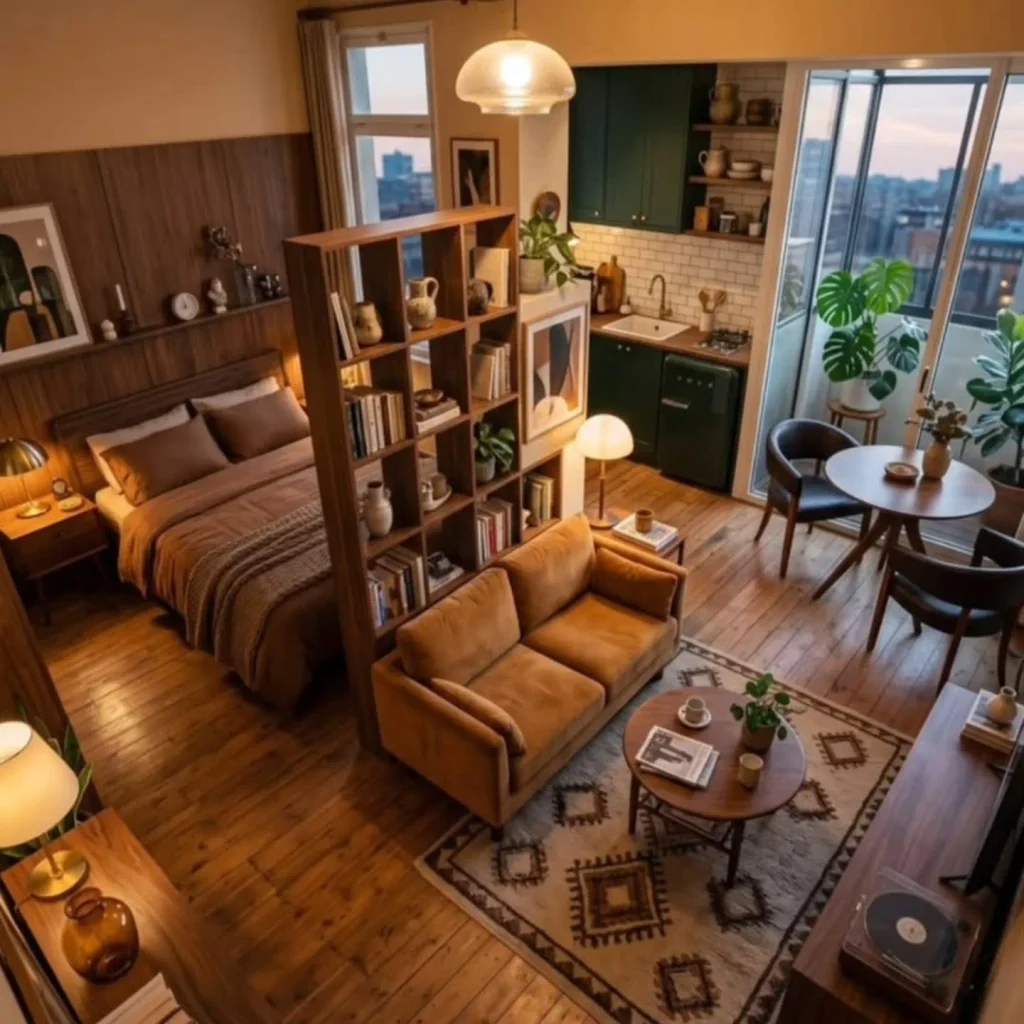
A tall walnut cube shelf splits this studio in two, with the bed tucked on one side and the living room on the other. The back is open, so light from the big windows and the warm lamps still reaches both zones. Neither side feels boxed in.
Why it works so well:
- The loveseat backs right up against the shelf, so the living side gets a real “wall” to lean on.
- Books, clay pitchers, and a small plant sit loosely in the cubbies, with gaps you can see through.
- The shelf’s wood tone matches the paneling behind the bed, so the whole room looks planned, not patched together.
Load the bottom rows with your heaviest books. A tall shelf standing on its own feels much steadier with the weight kept low.
Leave a few cubbies half empty so light and sightlines pass through.
Keep the heaviest books on the bottom two rows.
Pick a wood tone that matches your bed frame or floors.
Packing every cube edge to edge. It turns into a dark, solid wall.
Heavy vases or stacks of books on the top shelf.
A closed-back shelf if the bed side has no window of its own.
2. Swap Your Headboard for a Tall Fabric Panel That Hides the Desk
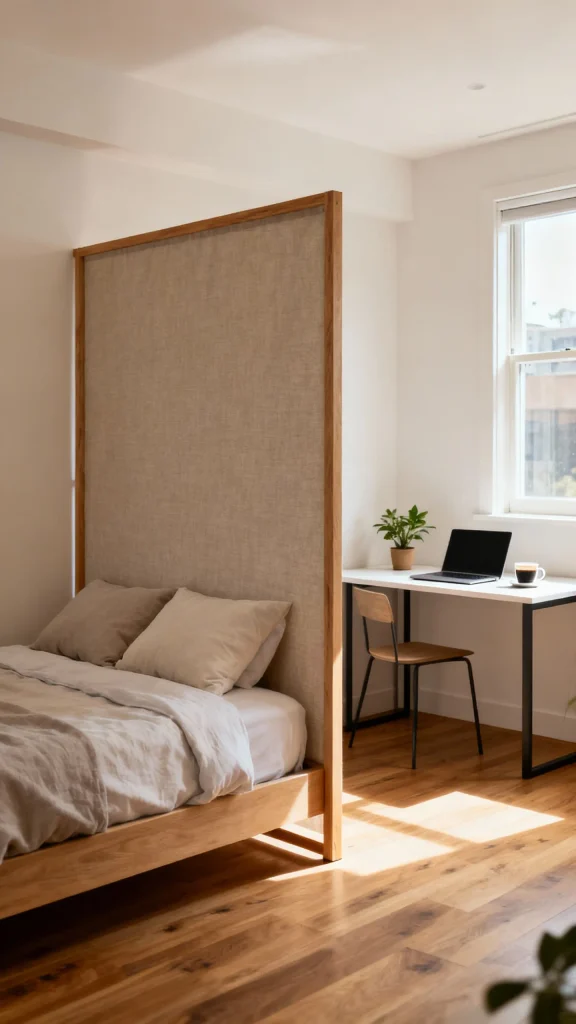
Sleep on one side, work on the other.
In this room the headboard is a tall panel of beige, linen-look fabric set in a light oak frame. It rises well above the pillows and runs past the edge of the bed. On the far side, a white desk with black metal legs sits by the window, out of sight when you’re lying down. The oak matches the bed frame and floors, so the panel looks like part of the bed, not an add-on.
To get the same effect:
- Go tall. The panel should clear your head when you sit up in bed.
- Pick a soft, textured fabric. It feels much cozier from the pillow side than bare wood.
- Push the bed tight against the panel and give the panel wide feet or brackets so it can’t wobble.
Best part? Your laptop is no longer the last thing you see at night.
3. Turn a Clothing Rack Into a Leafy Living Screen
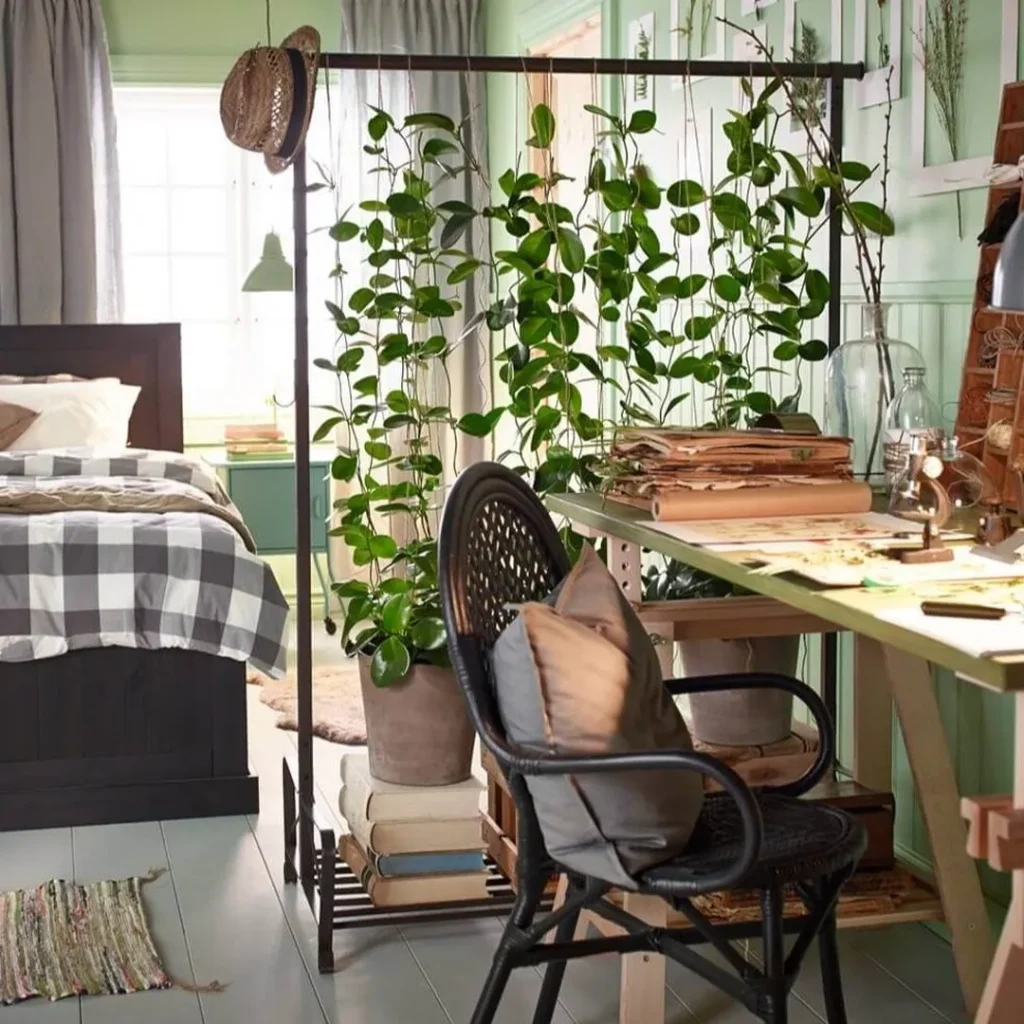
Nobody would guess this green wall started as a plain black clothing rack.
Strings hang from the top bar down to potted vines, and the glossy leaves climb them into a loose, leafy screen. The bed, with its gray and white checked quilt, sits on one side. A craft desk covered in pressed plants and paper sits on the other. You can still see through the gaps between the leaves, so both sides stay bright.
How it comes together:
The base. The rack’s low shelf and a stack of books lift the pots to different heights.
The climb. Several strings run straight down, so the vines fill the frame evenly.
The extra. A straw hat hangs on one corner, a hint that the rack still works as a rack.
Watch out: vines need steady light. Put the rack near a window, or your screen will thin out fast.
| 🌿 Real vines | 🪴 Faux vines |
|---|---|
| Soft and alive, and it changes as it grows. | Looks the same every day of the year. |
| Needs regular watering and trimming. | Needs a quick dusting now and then. |
| Wants a bright spot near a window. | Works fine in a dim corner. |
| Takes time to fill in the frame. | Full and finished on day one. |
4. Close Off the Bed With Black-Framed Glass Sliders
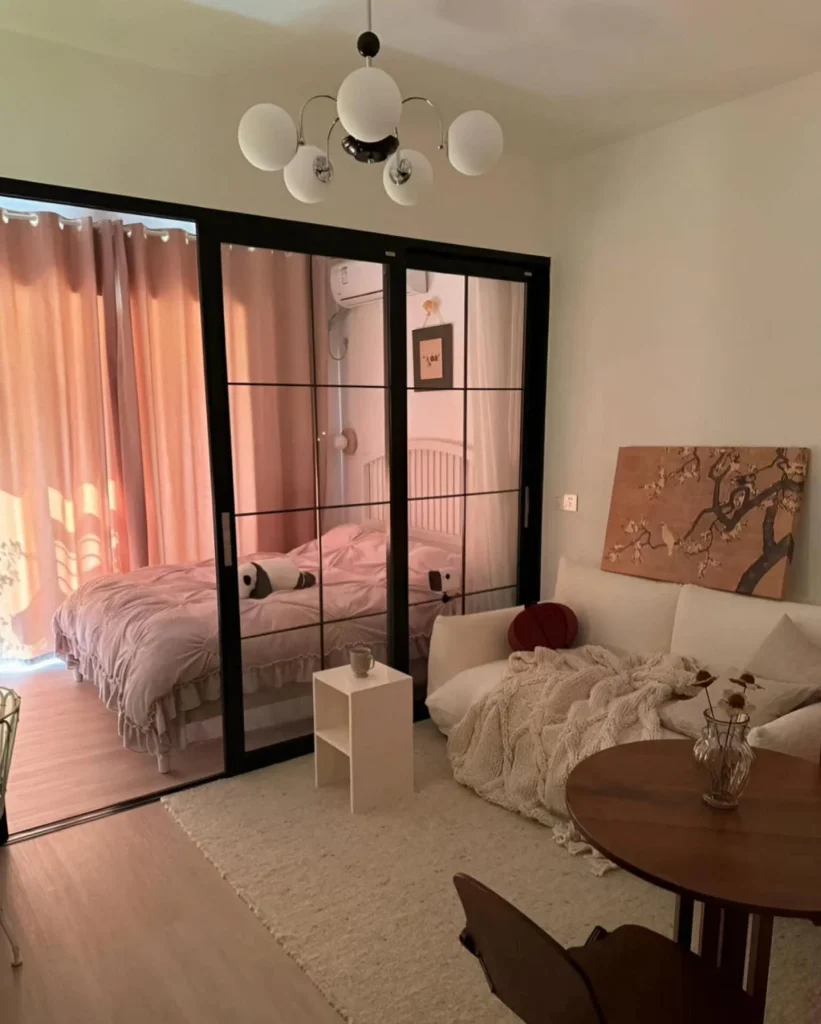
Want a real door on your sleep zone without giving up any daylight?
Here, black-framed glass sliders split the bed from the living room. The bedroom side is all soft pink, with a ruffled quilt and a white spindle headboard. The living side stays creamy and calm, with a low sofa, a chunky knit throw, and a globe light overhead. One panel is slid open, and the thin black grid makes the glass read as a wall even though you can see right through it.
Clear or frosted?
Clear glass like this keeps the studio feeling like one bright room. Removable frosted film on the lower panes adds privacy when friends come over, and most of it peels off cleanly when you move.
It’s also the only divider so far that actually closes, which helps muffle the TV while someone else is sleeping.
5. Build a Tension-Mounted Slat Wall That Never Touches a Drill

Slats block the view but let the light slip through.
Vertical wood slats run from floor to ceiling between the bed and the sofa, held up by pressure instead of screws. From the couch you see a warm, striped wall. From the bed you see thin lines of daylight between the boards. When you move out, it comes down in an afternoon and leaves no holes in the ceiling.
Why slats beat a solid panel:
- The gaps keep a small studio from feeling chopped in half.
- Air and heat still move freely around the room.
- A slat can hold a small hook or hanging plant, so the real walls stay untouched.
Space the slats a finger’s width apart for privacy, or wider if the bed side has no window.
Measure from floor to ceiling in three spots. Old ceilings are rarely even.
Stand two wood posts at the ends and press them in place with tension adjusters at the top.
Attach cross rails, then screw the slats to the rails. Use a scrap block as a spacer so every gap matches.
Stick felt pads on the top and bottom of each post to protect the ceiling and floor.
6. Turn a Tall Wardrobe Sideways and Let Storage Be the Wall

Most studios are short on two things: walls and closet space. This idea fixes both.
Set a tall wardrobe at a right angle to the wall, with its doors facing the bed. Now the bed is hidden from the front door, and you get a small dressing corner where you actually get dressed.
The back side problem. The plain back of the wardrobe now faces your living room. Cover it with peel-and-stick wallpaper, hang a row of light framed prints with removable strips, or park a narrow bench in front of it. Any of these makes it look like a real wall.
Push one end tight against the wall and strap it there. A wardrobe standing sideways is top heavy, so keep the bulky stuff on the bottom.
The wardrobe hugs a wall, the bed is the first thing guests see, and clothes pile up on a chair.
The wardrobe stands sideways, the bed tucks out of view, and the back becomes a gallery wall for the living side.
7. Stand a Folding Cane Screen at the Foot of the Bed
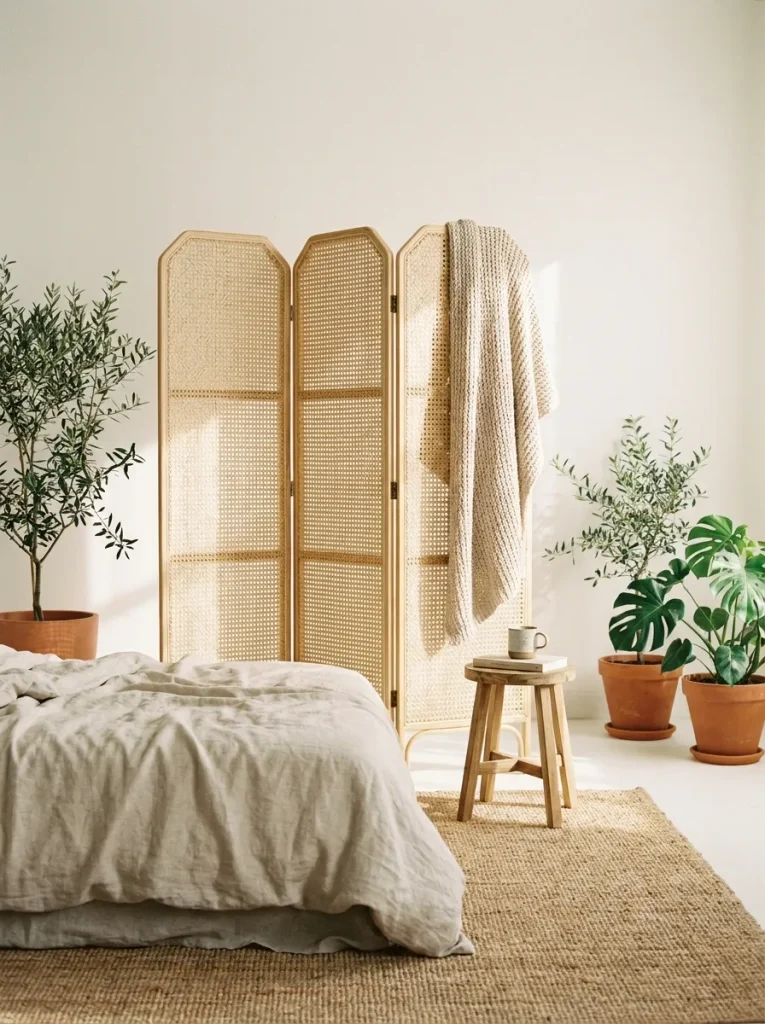
Here’s the divider you can fold flat and slide behind the sofa when you want the room open again.
Set a three or four panel screen at the foot of the bed, angled in a loose zigzag. It hides the rumpled sheets from the rest of the room without closing anything off.
Cane or solid panels? Natural cane lets a soft glow pass through the weave, so the room stays bright and feels relaxed and a little boho. Solid wood or painted panels give you real privacy, but they look heavier and cut more light. In a small studio with one window, cane usually wins.
Never stand a screen in a straight line. The zigzag is what keeps it from tipping.
Before you buy a folding screen
8. Float the Sofa With Its Back to the Bed

Floating the sofa in the middle of the room sounds odd until you see what it does. Turn it so the back faces the bed, then slide a slim console table right up behind it. The sofa marks where the living room ends, and the console gives the bed side a low wall with a lamp on top.
If two people share the studio, these studio apartment ideas for couples help.
What the console can hold:
- A lamp that lights both zones at night.
- A basket or two for throws and phone chargers.
- A short stack of books so the back looks finished.
Pick a sofa with a tidy, finished back. You’ll be looking at it from your pillow every night.
Floating the sofa works best when the rest of the room is planned around it. These 400 square foot apartment layout ideas show it in action.
The sofa you already own does the dividing. The console just makes the back look good from the bed.
9. Roll In a Pegboard Partition That Stores Stuff on Both Sides
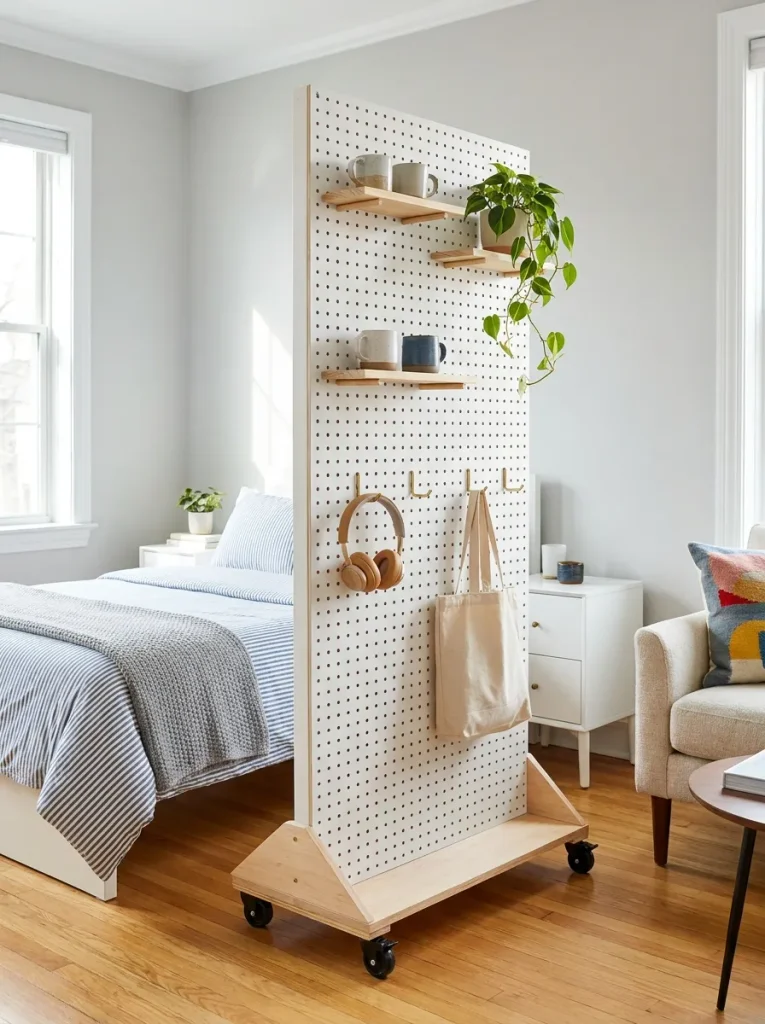
Think of this as a wall that holds your things.
A tall pegboard panel on a wheeled base stands between the bed and the rest of the room. Hooks, small shelves, and cups fit into the holes, so each side gets its own storage. Lock the wheels once it’s in place, and unlock them when you want the room open again.
On the living side: headphones, keys, a small plant, and a little shelf for mail.
On the bed side: a clip-on reading light, a hook for tomorrow’s outfit, and a cup for your phone and glasses.
Paint it the same color as your walls if you want it to blend into the room.
10. Stand Fluted Acrylic Panels Where a Glass Wall Would Go
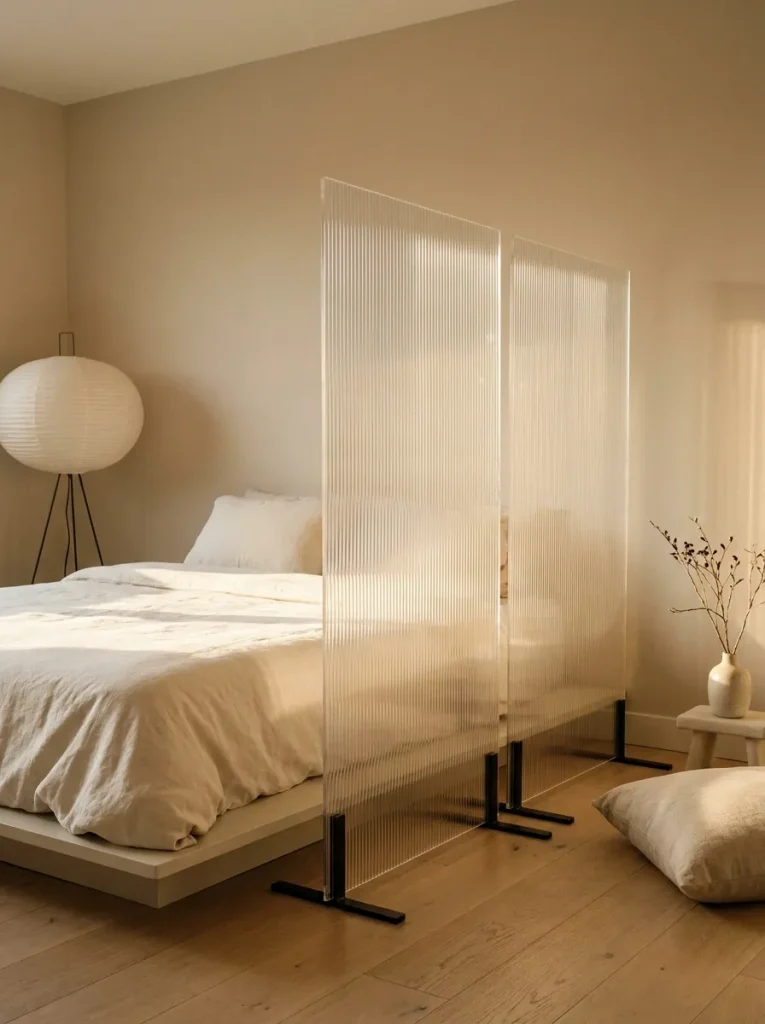
Love the look of a glass wall but rent your place?
Freestanding fluted acrylic panels on sturdy feet give you that same soft, ribbed look with no construction at all. The ridges blur whatever sits behind them, so an unmade bed turns into a gentle shape instead of a mess. Light still pours through.
Where to place them. Line up two or three panels a step away from the bed, and leave a gap at one end to walk through. Clear acrylic keeps the room bright. A smoky or amber tint adds warmth at night.
It looks high end, and it packs flat when you move.
📌 Good To Know
Acrylic scratches more easily than glass. Dust it with a soft microfiber cloth, not paper towels, and skip glass cleaners that contain ammonia.
11. Frame the Bed With a Bare Metal Canopy
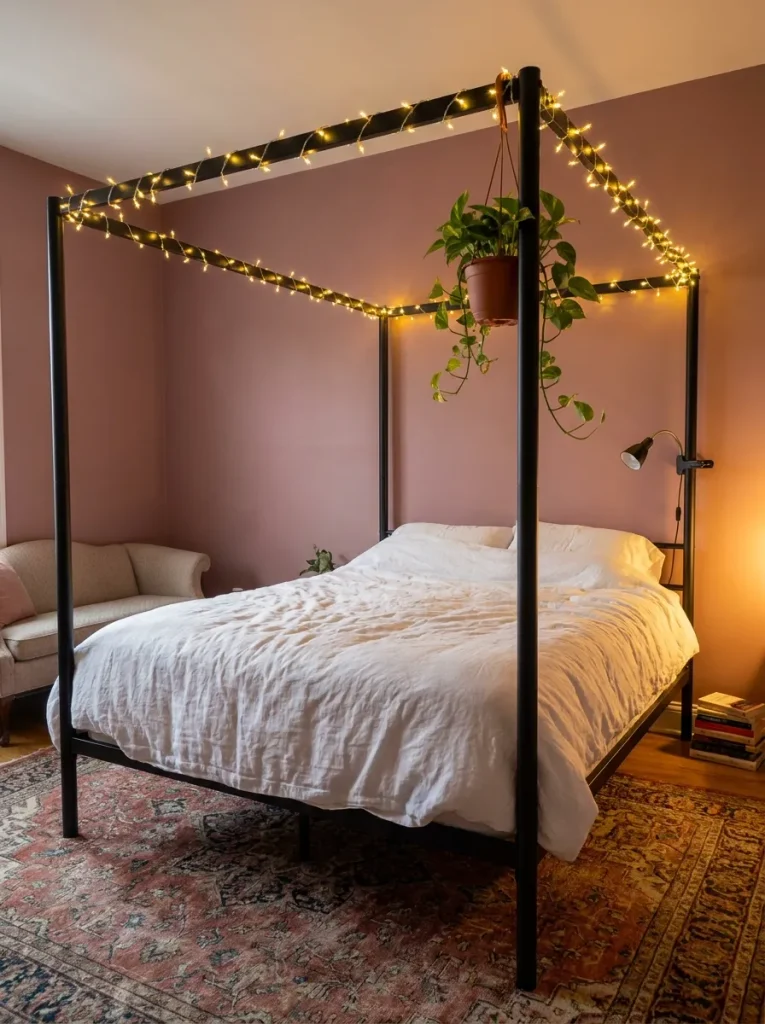
Keep the frame, skip the fabric.
A black metal four-poster bed draws a clear outline around where you sleep. Nothing hangs from it, so it blocks no light and no view. Your eye still reads the bed as its own little room.
Three ways to dress the frame without drapes:
- Wrap warm string lights along the top rails.
- Hang a small pot of trailing greenery from one corner.
- Clip a reading lamp to a post and free up your nightstand.
It’s the lightest divider on this list, and easily the most romantic.
Pick a frame with thin posts so it doesn’t crowd the room.
Match the metal to your lamps or cabinet handles.
Keep what hangs from it light and few.
A chunky wood four-poster in a tiny studio.
Lights, plants, and lamps on every rail at once.
Heavy planters hanging from the top bars.
12. Paint a Freestanding Arch Panel for a Doorway Without a Door

Curves are rare in a boxy studio, which is exactly why this one stands out. A tall plywood panel with an arched opening stands on sturdy feet at the edge of the bed area. You walk through the arch into the sleep zone, like stepping through a real doorway.
Blend it in. Paint it the same shade as your walls so it looks built in.
Make it the star. Soft terracotta, sage, or clay turns it into the focal point of the whole studio.
Watch out: a tall, flat panel wants to fall over. Give it wide feet, and add a weighted base if it wobbles at all.
Trace the arch on the plywood with a pencil tied to a string, pinned at the center point.
Cut the opening with a jigsaw and sand the edges smooth.
Prime and paint both sides, since the bed side will see it too.
Screw on wide L-shaped feet or a solid wood base so it stands firm.
13. Raise the Bed Area on a Low Platform
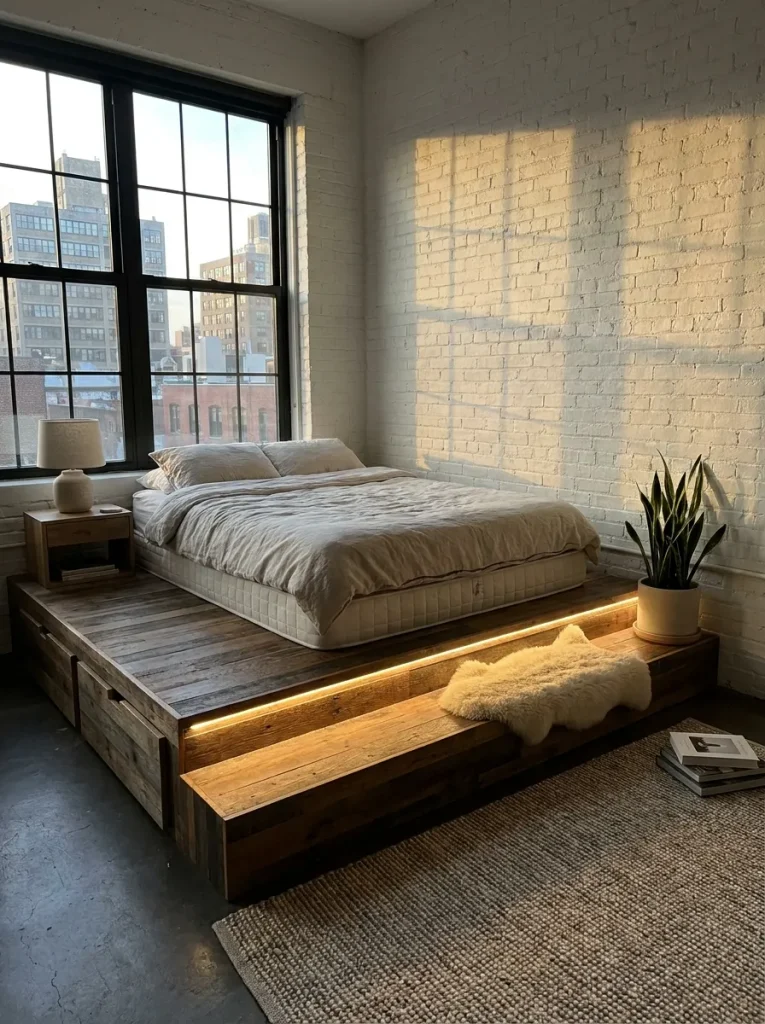
Step up to bed, literally.
A low wooden platform under the bed zone lifts it one step above the rest of the floor. That small change in height tells everyone where the bedroom starts, with no wall in sight. Build it from simple boxes screwed together, and it comes apart in pieces when you move.
What fits underneath:
- Pull-out drawers for off-season clothes.
- Flat bins for shoes and spare sheets.
- Your suitcase, lying flat and out of the way.
Run a soft strip light along the step edge so nobody trips in the dark.
14. Zone It With a Rug, a Light, and a Block of Color
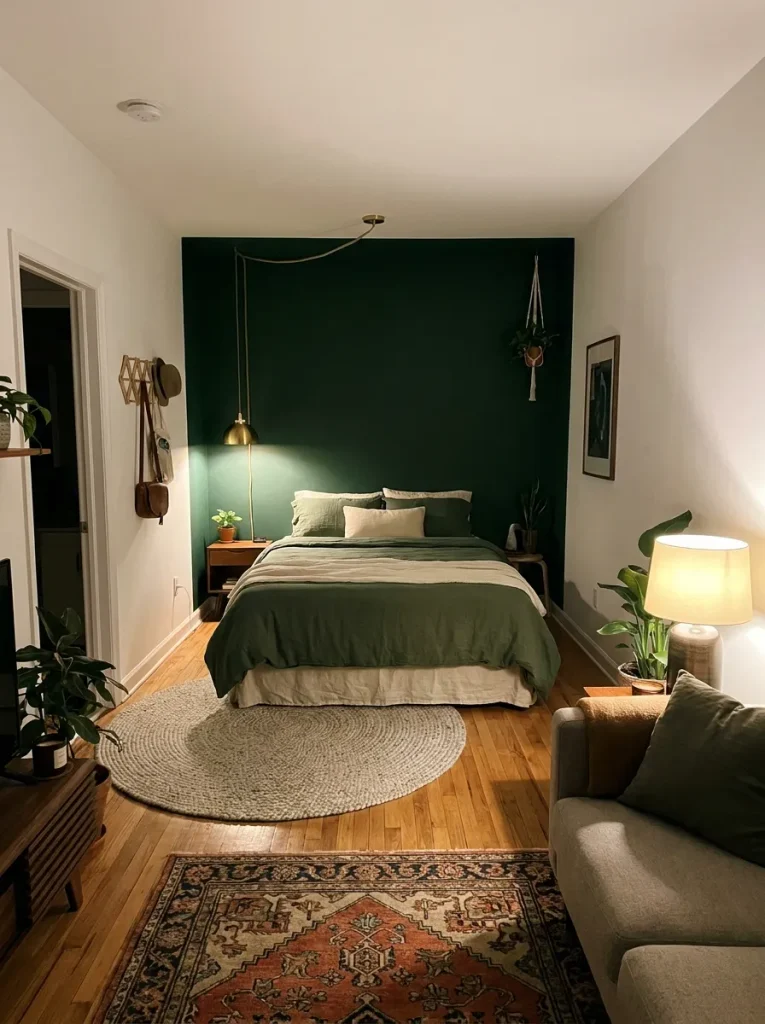
Sometimes the best divider isn’t a divider at all. In a tight studio, anything that stands on the floor eats space you need. So give the bed area its own set of signals instead, and your brain reads it as a separate room:
- A rug of its own. Big enough for the bed to sit on, and different from the living room rug.
- A light of its own. A plug-in pendant or sconce over the bed, on its own switch.
- A color of its own. Paint a block of color behind the bed, or use peel-and-stick wallpaper if painting is off the table.
Stack all three and the bed feels like it has walls.
Your zone-it shopping list
15. Line Up Floor Mirrors to Hide the Bed and Bounce the Light
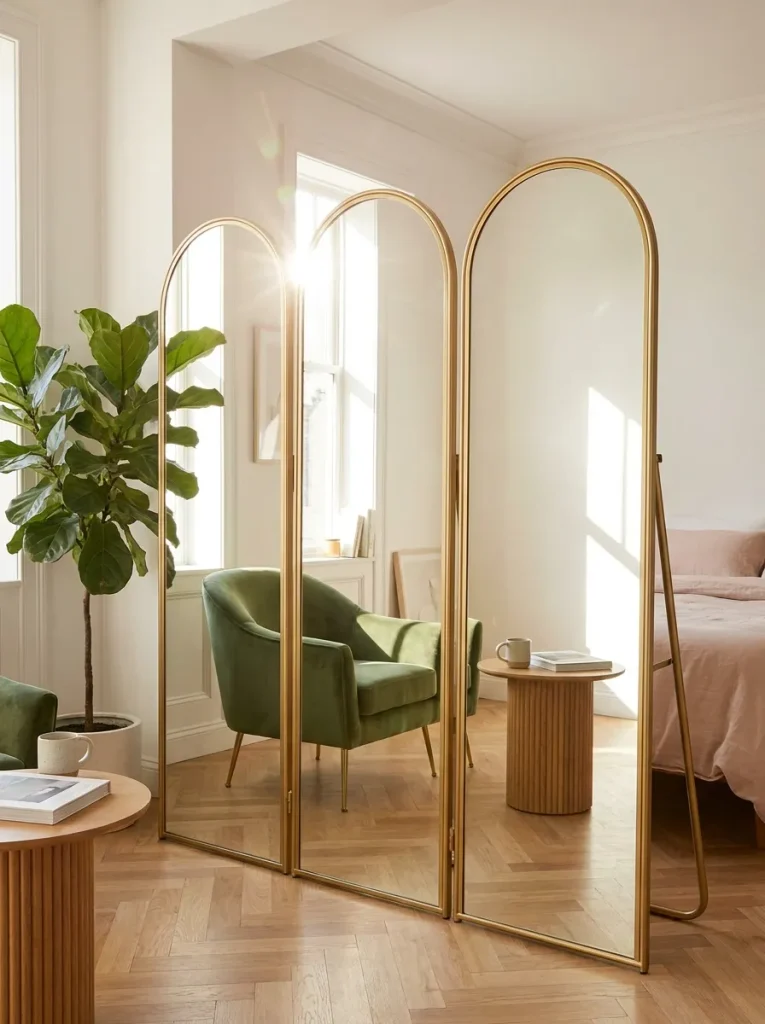
Mirrors hide the bed and make a studio look bigger at the same time. Stand two or three tall floor mirrors side by side on their own stands, with the mirror side facing the living room and the backs facing the bed. Guests see the room and the window light reflected back at them, and the bed simply disappears.
Watch out. Glass mirrors are heavy and can shatter if they tip. Choose sturdy stands, or look for shatterproof acrylic mirrors, which weigh far less.
Add a slim hook or two to the backs, and the bed side gets a spot for robes and bags.
If you love this trick, I’ve got more mirror ideas for small spaces that double the light.
The bed is in plain view, and the room ends where the bed begins.
The bed is out of sight, and the living side looks deeper and brighter in the reflection.
Conclusion:
A studio doesn’t need four walls to feel like a real home. It just needs a clear spot where the day ends and rest begins. Start with what you already have, like a bookshelf, a wardrobe, or the sofa you sit on every night. Then add one piece that makes the line feel planned, such as a plant, a lamp, or a rug of its own. In a small space, small changes like these go a long way.
Want a curtain after all? Here’s how to hang a room divider curtain without drilling.
Found a divider you want to try? Save this pin to your small space board so it’s there when you’re ready to rearrange.
Picked your divider? Here’s a weekend plan to zone your studio, from the graph paper sketch to the final walkthrough.
Not sure where to start?
- ▸Need privacy most? Try the wardrobe, the slat wall, or glass sliders with frosted film.
- ▸Short on floor space? Go with the canopy frame or the rug, light, and color trick.
- ▸Need more storage? Pick the cube bookshelf, the pegboard, or the raised platform.
- ▸Want more light? Choose the mirrors, the acrylic panels, or the cane screen.

